
| Writing Non-Fiction posted January 4, 2017 |
  |
Tom handed me this today . hope you can follow it!
Steps to Make Ornaments
by Teri7
 Step 1
Place wrapping paper (colored side down) on a flat surface, take pencil and yogurt cup or a 15 or 16 oz. can and at a corner of the paper start drawing circles on the paper with sides of circles touching one another to maximize the use of the paper and have as little waste as possible.
Step 2
With the scissors, cut out twelve circles. All circles should be the same size. Fold the circles in half, then half again in half having three folds and having the circle into eight sections. if the circle were a pizza each section would look like one slice out of the pizza. Along the edges take the scissors and cut from the outside of the circle toward the center point approximately 5/6 of the way toward the center point on all three folds. To complete this task four cuts will need to be made. Unfold the circle. If done correctly the circle will have eight slits in it and look like a pizza without the cuts extending through the center of the circle. These eight sections will then be rolled around a sharpened pencil and a small dab of glue with be applied to secure the point.
Step 3
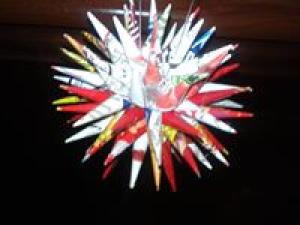
With the pencil in your right hand and the circle in your left hand -with the section you wish to roll between your left thumb and forefinger, roll each section with the white side of the paper facing you. Working counter-clockwise rolling and gluing each of the eight sections of the circle for a right handed person seems to avoid getting glue on the next section. It is very important to use the right amount of glue as not enough will not allow the paper to stick and too much will possibly get on the pencil or other unfinished sections and will ruin the ornament. Any excess glue on fingers should be wiped off with a damp cloth. Continue rolling each section until all eight sections are rolled into points looking like an eight pointed star. Complete this process for the remaining circles.
Hint: It helps if your left thumbnail has a little growth to it to allow easy rolling of the sections around the pencil point.
Step 4
Thread a needle with fishing line (approx. a foot in length). Fishing line is used for its excellent strength. Thread a small button that has only two holes (one end of each thread going through each hole). Tie off fishing line and cut any excess after the knot. Thread through the center point the twelve eight pointed stars beginning with the first one with the non-colored side toward the button. Thread the next one with the colored side down alternating until all twelve eight pointed stars are threaded. If done correctly, the last star will have the non-colored side facing up. Cut the fishing line right behind the needle and thread a second button the same as the first. Take the threads of the fishing line and cross them over making the first part of a knot and pulling tight making the eight pointed stars form a ball around the buttons. Carefully cross the threads again forming a knot making sure the threads do not get tangled in any of the star points. Line up both threads and tie off approximately 6 to 8 inches above ball and cut excess thread off above the knot.
Notes:
If you are having trouble getting the rolling process started, a little moisture placed on the thumb side of the eventual star point that is to be made will help the paper stick to the pencil and allow the roll to be completed easier. The little moisture may come from your spit or a damp wash cloth or paper towel.
When cutting out the circles they do not have to be cut exactly on the lines drawn but should be cut fairly close to those lines.
Once you feel comfortable with the scissors and cutting the slits along the folds you can try placing three or four circles on top of one another and avoid folding the third time but making sure to make the last cut between the folds. Still making four cuts. This will allow you to have three or four cut circles in the same time you were cutting one.
This is the end of this lesson on making the tree ornament. If you can't understand this Tom has typed this out on paper. If you need him to he will mail it to you. Won't cost you anything but hopefully help you to make pretty ornaments for your tree this year coming up!
May God bless each of you today!
Written by: Teresa A. Shortess and Tom!
Copyright@2016
Step 1
Place wrapping paper (colored side down) on a flat surface, take pencil and yogurt cup or a 15 or 16 oz. can and at a corner of the paper start drawing circles on the paper with sides of circles touching one another to maximize the use of the paper and have as little waste as possible.
Step 2
With the scissors, cut out twelve circles. All circles should be the same size. Fold the circles in half, then half again in half having three folds and having the circle into eight sections. if the circle were a pizza each section would look like one slice out of the pizza. Along the edges take the scissors and cut from the outside of the circle toward the center point approximately 5/6 of the way toward the center point on all three folds. To complete this task four cuts will need to be made. Unfold the circle. If done correctly the circle will have eight slits in it and look like a pizza without the cuts extending through the center of the circle. These eight sections will then be rolled around a sharpened pencil and a small dab of glue with be applied to secure the point.
Step 3
With the pencil in your right hand and the circle in your left hand -with the section you wish to roll between your left thumb and forefinger, roll each section with the white side of the paper facing you. Working counter-clockwise rolling and gluing each of the eight sections of the circle for a right handed person seems to avoid getting glue on the next section. It is very important to use the right amount of glue as not enough will not allow the paper to stick and too much will possibly get on the pencil or other unfinished sections and will ruin the ornament. Any excess glue on fingers should be wiped off with a damp cloth. Continue rolling each section until all eight sections are rolled into points looking like an eight pointed star. Complete this process for the remaining circles.
Hint: It helps if your left thumbnail has a little growth to it to allow easy rolling of the sections around the pencil point.
Step 4
Thread a needle with fishing line (approx. a foot in length). Fishing line is used for its excellent strength. Thread a small button that has only two holes (one end of each thread going through each hole). Tie off fishing line and cut any excess after the knot. Thread through the center point the twelve eight pointed stars beginning with the first one with the non-colored side toward the button. Thread the next one with the colored side down alternating until all twelve eight pointed stars are threaded. If done correctly, the last star will have the non-colored side facing up. Cut the fishing line right behind the needle and thread a second button the same as the first. Take the threads of the fishing line and cross them over making the first part of a knot and pulling tight making the eight pointed stars form a ball around the buttons. Carefully cross the threads again forming a knot making sure the threads do not get tangled in any of the star points. Line up both threads and tie off approximately 6 to 8 inches above ball and cut excess thread off above the knot.
Notes:
If you are having trouble getting the rolling process started, a little moisture placed on the thumb side of the eventual star point that is to be made will help the paper stick to the pencil and allow the roll to be completed easier. The little moisture may come from your spit or a damp wash cloth or paper towel.
When cutting out the circles they do not have to be cut exactly on the lines drawn but should be cut fairly close to those lines.
Once you feel comfortable with the scissors and cutting the slits along the folds you can try placing three or four circles on top of one another and avoid folding the third time but making sure to make the last cut between the folds. Still making four cuts. This will allow you to have three or four cut circles in the same time you were cutting one.
This is the end of this lesson on making the tree ornament. If you can't understand this Tom has typed this out on paper. If you need him to he will mail it to you. Won't cost you anything but hopefully help you to make pretty ornaments for your tree this year coming up!
May God bless each of you today!
Written by: Teresa A. Shortess and Tom!
Copyright@2016
 Recognized |
I was typing this but I had to stop. I called him into the room and asked if he would type it as he knew what it was saying. I hope this helps the ones that wanted the instructions to making the ornament! Blessings to each and everyone of you! Teri
Pays
one point
and 2 member cents. 
You need to login or register to write reviews. It's quick! We only ask four questions to new members.
© Copyright 2024. Teri7 All rights reserved.
Teri7 has granted FanStory.com, its affiliates and its syndicates non-exclusive rights to display this work.